Building Your Own PaaS with Dokku
Today I’ll show you how to set up your own Heroku-like platform to simplify application deployment.
Heroku is a Platform-as-a-Service (PaaS) that makes developers’ lives easier by streamlining application deployment, whether they’re built with Node.js, Ruby, PHP, Python, or other technologies.
This type of service becomes invaluable when you don’t want to spend time configuring deployments or lack the system administration skills to install all the necessary tools and dependencies for your application.
You might ask, “But Thomas, if Heroku already offers this service, why would we create our own PaaS?” The answer is simple: Heroku is convenient, but costs can escalate quickly for resource-intensive applications or when trying to reduce infrastructure expenses. We’ll also explore why running your own PaaS on a development machine eliminates the need to manually install services, tools, and dependencies for new projects.
Step 1: Installing Docker
Docker is a tool you’ve likely heard of. Here’s a concise definition:
Docker is an open-source platform that packages applications and their dependencies into Linux containers. Container-based virtualization isolates applications from each other on a shared operating system. This approach simplifies application deployment by enabling applications to run in any environment—physical or virtual.
If you’re on Ubuntu, installing Docker is straightforward:
sudo apt-get install dockerFor Windows, macOS, or other Linux distributions, consult the official Docker documentation.
Now that Docker is installed, let’s explore PaaS capabilities.
Step 2: Installing Dokku
Dokku is an open-source solution for creating your own Heroku-like platform on Docker. I chose Dokku because it has an active community and abundant resources for help and tips. Alternative solutions like CapRover exist—perhaps I’ll explore those in the future.
Installing Dokku
On Debian-based distributions, install Dokku with these commands:
wget https://raw.githubusercontent.com/dokku/dokku/v0.12.10/bootstrap.sh
sudo DOKKU_TAG=v0.12.10 bash bootstrap.sh
You’ll see an installation process start. Wait for the script to complete.
Once finished, open your web browser and navigate to your machine’s IP address or localhost.
Configuring Dokku
Now that Dokku is installed and running, let’s configure it:
- Paste your public SSH key in the textarea. This key will allow you to administer your Dokku PaaS
- Choose a hostname for your Dokku installation—this will be used to access your applications
After configuration, you’ll be redirected to the official Dokku documentation explaining application deployment. We’ll walk through that process here as well.
Deploying Your First Application
The moment has arrived—let’s deploy our first application on our freshly configured PaaS!
We’ll use a basic Ruby on Rails application from Heroku’s repository to demonstrate how to launch applications with Dokku:
- Clone the source files:
git clone https://github.com/heroku/ruby-rails-sample.git- SSH into your Dokku server and create the application:
dokku apps:create ruby-rails-sampleThe first part (dokku apps:create) tells Dokku to create an application, followed by the application name (ruby-rails-sample).
Your app is created but not yet functional. This application requires a PostgreSQL database, so we’ll launch a PostgreSQL instance and link it to our ruby-rails-sample application.
- Install the PostgreSQL plugin:
sudo dokku plugin:install https://github.com/dokku/dokku-postgres.git- Create a PostgreSQL instance:
dokku postgres:create rails-databaseNote that we’re using dokku postgres (from the plugin) rather than dokku apps:create (a native Dokku command).
- Link the application to the database:
dokku postgres:link rails-database ruby-rails-sample- Add a Git remote pointing to your Dokku service:
git remote add dokku dokku@<your-domain>:ruby-rails-sample- Push the code to deploy:
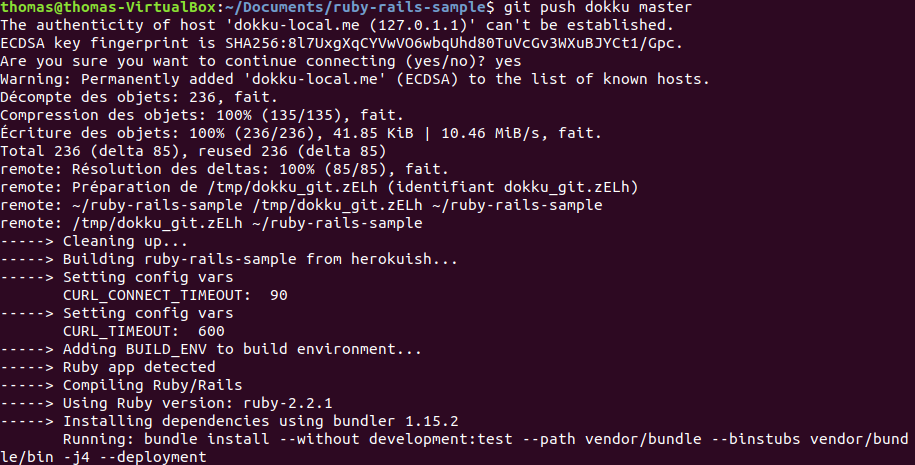
git push dokku masterIf you’ve configured your server correctly, you should see output in your terminal showing Dokku detecting your pushed code, installing necessary packages, deploying the application, and making it accessible.
Conclusion
Congratulations! You’ve just learned how to deploy applications on your own PaaS using Dokku. You can now focus on building your application rather than worrying about deployment logistics. We’ve only scratched the surface—I encourage you to explore the official documentation.
The beauty of this solution is that installing Dokku locally on your development machine eliminates the need to install Apache, PHP, MySQL, PostgreSQL, and other tools. You only need Docker and Dokku, then push your code to deploy and test your application or website.
You can also deploy this on a server or cloud instance from any provider—the process remains identical.
Another advantage is integrating this with Continuous Deployment (CI/CD) from a Git repository to automatically deploy staging, pre-production, or even production environments if your production runs on Dokku.