Moltbot REX: Setting Up a Local AI Assistant
Introduction to Moltbot
Moltbot is a cutting-edge agent AI designed to serve as your personal assistant, integrating seamlessly into your daily life. Unlike generic chatbots or AI tools, Moltbot is built to be highly customizable, multi-platform, and locally controlled, making it the ultimate choice for users who prioritize privacy, security, and autonomy.
Key Features of Moltbot
-
Multi-Platform Accessibility
- Reach your assistant from anywhere via WhatsApp, Telegram, Discord, iMessage, Slack, and more.
- A single interface to manage all your tasks, communications, and automation across platforms.
-
Seamless Integration with AI Providers
- Connects to multiple AI models (e.g., Anthropic, OpenAI, Google, Ollama…) via local or cloud endpoints.
- Supports both open-source and proprietary models, ensuring flexibility and control over your AI interactions.
-
Web Navigation and Automation
- Use built-in browser automation (via Chromium) to:
- Scrape data from websites.
- Fill forms, log in, and interact with web apps.
- Schedule tasks or send messages programmatically.
- Use built-in browser automation (via Chromium) to:
-
Persistent Memory System
- Unlike most AI tools that rely on short-term memory, Moltbot has a long-term memory system stored locally.
- This means it can:
- Recall past conversations, decisions, and preferences.
- Track progress across sessions (e.g., follow-up tasks, reminders).
- Adapt its behavior based on historical data.
-
Full Local Control
- Runs entirely on your personal hardware, ensuring no data leaks or third-party access.
- No reliance on cloud providers—your data stays private and under your control.
- But if you aren’t using a local model, it’s not local anymore!
-
Extensible with Skills
- Supports a wide range of skills (e.g., GitHub integration, Slack automation, weather updates) to extend functionality.
- Easily add or remove skills based on your needs.
Setting Up Moltbot Locally
Why Go Local?
To ensure full privacy and control, I decided to host Moltbot entirely on my personal hardware. This means:
- No data leaks: All interactions, configurations, and memory are stored locally.
- No dependency on cloud providers: No risk of rate limits, downtime, or unexpected changes in AI model behavior.
- Full customization: I can tweak the AI models, browser automation, and system settings to fit my exact needs.
Step-by-Step Setup
1. Environment Preparation
Prerequisites:
- A Ubuntu Server 24.04 VM (or bare-metal machine).
- Sufficient hardware resources:
- CPU: 2 cores.
- RAM: At least 4GB.
- Storage: At lease 20GB.
Test hardware I used for experiments:
- Mac Mini M4 with 24GB RAM running an Ubuntu Server 24.04 guest inside a UTM VM. I host
Ministral 8B Thinkingwith a 32K-token context window (the model configuration requires roughly 8GB of VRAM for inference). I run LMStudio locally as my model host, but you can also use Ollama or any local provider that implements the OpenAI-compatible API — Moltbot only needs an OpenAI-style endpoint to work.
Installation Steps:
- Set up the VM: For this, you can use your favorite virtual machine software like QEMU, VMWare, Proxmox, UTM… I will not explain how to install a Ubuntu Server, there is plenty of tutorial on the web to help you with this.
- Install Homebrew (for package management):
/bin/bash -c "$(curl -fsSL https://raw.githubusercontent.com/Homebrew/install/HEAD/install.sh)" echo 'export PATH="/usr/local/bin:$PATH"' >> ~/.bashrc source ~/.bashrc - Install Moltbot:
Follow the official installation guide for additional configurations.curl -fsSL https://molt.bot/install.sh | bash
2. Configuring AI Models
Moltbot supports multiple AI models, but I chose to use Mistral due to its performance and open-source nature.
Installing LMStudio (Local Model Host): LMStudio provides a user-friendly interface for running large language models locally.
Configuring Moltbot to Use Mistral:
- Download the Mistral model:
- Download the
mistral-8bmodel from LMStudio’s model hub and load it.
- Download the
- Configure Moltbot to use the local model:
Edit
~/.moltbot/moltbot.json:{ ... "models": { "providers": { "lmstudio": { "baseUrl": "http://YOUR-HOST-IP:1234/v1", "apiKey": "lmstudio-local", "api": "openai-completions", "models": [ { "id": "mistralai/ministral-3-8b-reasoning", "name": "Ministral 8B", "reasoning": true, "input": [ "text" ], "cost": { "input": 0, "output": 0, "cacheRead": 0, "cacheWrite": 0 }, "contextWindow": 32000, //Needed to allow your model to use the available tools from Moltbot "maxTokens": 8192 }, ] } } }, "agents": { "defaults": { "model": { "primary": "lmstudio/mistralai/ministral-3-8b-reasoning" } ... } } }
3. Setting Up Browser Automation
To enable web navigation, form filling, and automation, I installed Chromium and configured it as a systemd service.
Install Chromium:
sudo snap install chromium --classicCreate a Systemd Service for Persistent Chromium:
- Create the service file:
sudo nano /etc/systemd/system/Moltbot-chromium.service - Paste the following configuration:
[Unit] Description=Chromium Headless (Snap) for Clawd.bot After=network.target [Service] ExecStart=/snap/bin/chromium \ --headless \ --disable-gpu \ --no-sandbox \ --remote-debugging-port=9000 \ --user-data-dir=%h/.moltbot/browser/moltbot/user-data about:blank Restart=on-failure RestartSec=5 [Install] WantedBy=multi-user.target - Enable and start the service:
sudo systemctl daemon-reload sudo systemctl enable moltbot-chromium.service sudo systemctl start moltbot-chromium.service - Add browser connection to your configuration, edit
~/.moltbot/moltbot.json:{ ... "browser": { "enabled": true, "executablePath": "/snap/bin/chromium", "headless": true, "noSandbox": true, "attachOnly": false, "defaultProfile": "clawd", "controlUrl": "http://127.0.0.1:8082", //The port value depends on how you configured moltbot gateway, it's always GATEWAY_PORT + 2 "cdpUrl": "http://127.0.0.1:9000" } } - Restart your moltbot gateway with
moltbot gateway restart
Explanation of Key Flags:
--no-sandbox: Required for remote debugging (Moltbot needs to control Chromium).--disable-gpu: Ensures consistent behavior across systems.--remote-debugging-port=9000: Allows Moltbot to connect and automate the browser.
4. Testing Your Setup
-
Verify AI Model Connection:
curl http://YOUR-HOST-IP/api/v1/modelsThis should return details about the Mistral model.
-
Open your first tchat session:
moltbot tui -
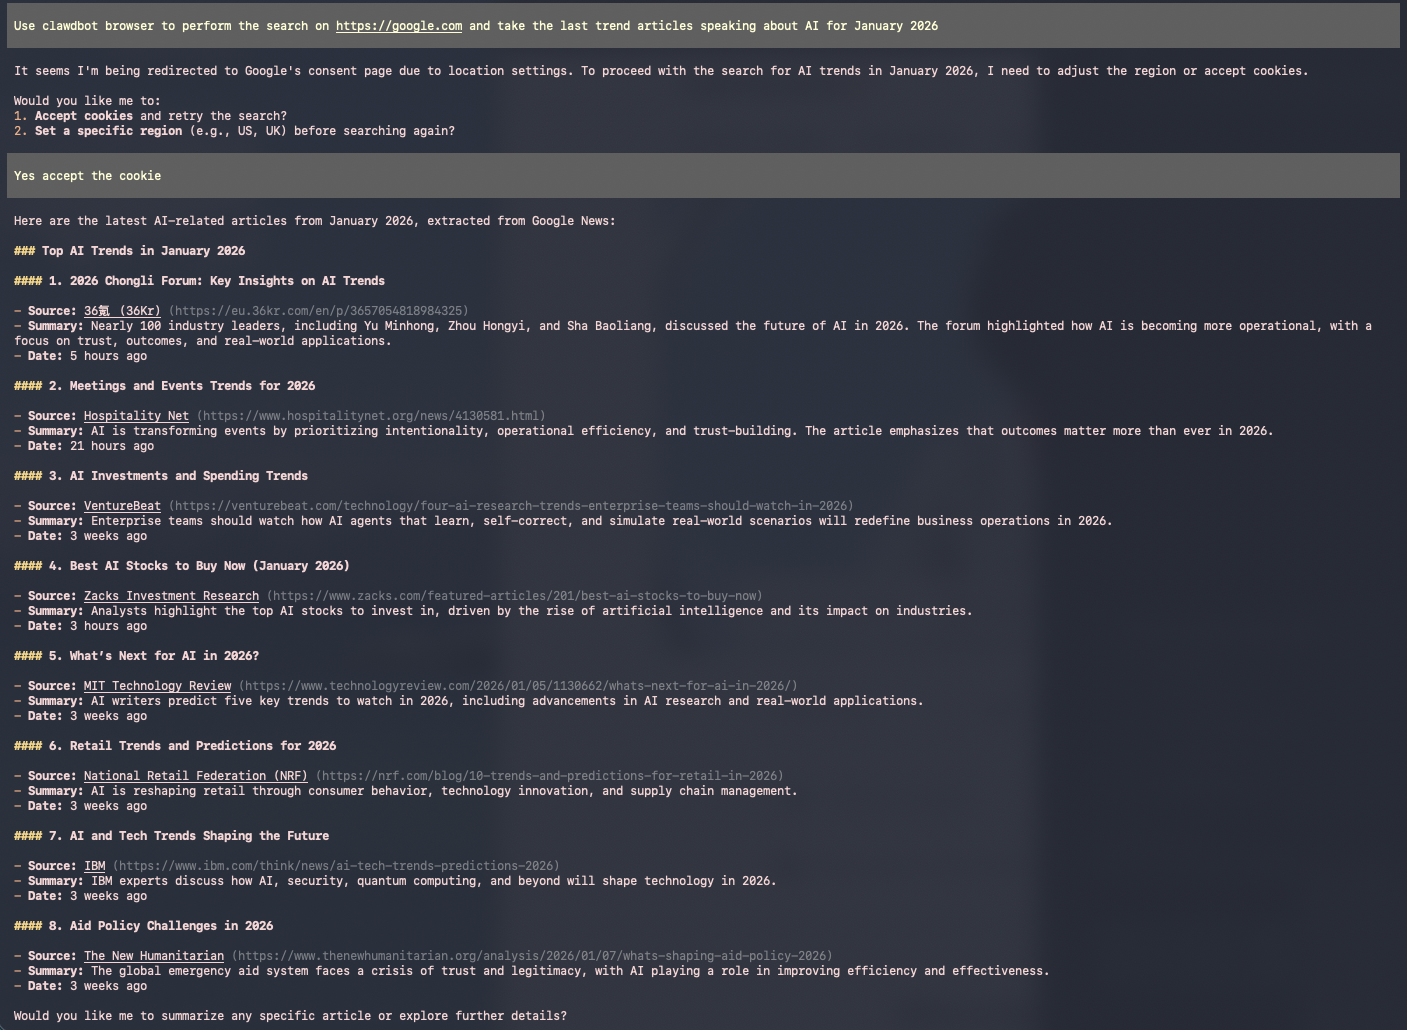
Test Browser Automation: Ask it a question to search on https://www.google.com the last trending articles about AI for January 2026.
Security warning — run Moltbot in a sandboxed environment: Do not give Moltbot direct access to your primary or personal accounts. Run it inside a sandbox (separate user account, container, or VM), restrict permissions to the minimum necessary, and avoid storing long-lived credentials in its configuration. Use short-lived tokens or service accounts where possible, require human approval for sensitive actions, and monitor all automated operations. AI agents can make destructive changes when unsupervised — do not let Moltbot operate alone on systems with real user accounts.
Setting Up Moltbot on macOS: Full Human-Like Interaction
While the Linux setup above is great for basic automation, Moltbot truly shines when it can interact with a system like a human. This means having full UI control, the ability to click, type, and navigate visual interfaces, not just run terminal commands.
To achieve this, we’ll set up Moltbot on a macOS VM with the Companion App and the Chrome extension, allowing the AI to control a real browser with a full graphical interface.
Why macOS for Full Interaction?
The macOS setup provides:
- Visual browser control via Chrome extension (not headless)
- System-level automation via the Companion App
- Node registration for remote control from your main Gateway
- Full human-like interaction with websites that detect headless browsers
CLI-Only vs Companion App: Which Do You Need?
Understanding the difference between these two approaches is crucial for choosing the right setup:
CLI-Only Setup (Headless)
Components: CLI + Gateway + Node (terminal-based)
Good for:
- Shell automation and scripting
- Browser automation (Playwright, Puppeteer)
- File system access and management
- Headless scripts and DevOps tasks
- API integrations and backend automation
Limitations:
- macOS UI automation is fragile and unreliable
- AppleScript may fail silently
- Screen capture and vision workflows don’t work
- No menu bar UI or system notifications
- Cannot perform human-like UI interactions (clicking, typing in GUI apps)
CLI + Companion App Setup
Components: CLI + macOS Companion App + Gateway + Node
Enables:
- Reliable macOS UI automation (mouse, keyboard, window management)
- Screen capture and visual reasoning
- Camera and microphone access
- Robust AppleScript and system automation
- Gateway auto-start, crash recovery, and system notifications
- Full human-like desktop interaction
Feature Comparison Matrix
| Feature Category | CLI-Only | Companion App | Notes |
|---|---|---|---|
| Human-like Mac UI (mouse, keyboard, windows) | ❌ Fragile | ✅ Required | Needs Accessibility + Input Monitoring |
| Screen capture / vision / clicks | ❌ No | ✅ Required | Needs Screen Recording permission |
| Camera / microphone / media | ❌ No | ✅ Required | Needs TCC permissions |
| AppleScript / System Events | ⚠️ Unreliable | ✅ Reliable | CLI works sometimes; Companion is better |
| Gateway reliability (auto-start, recovery) | ⚠️ Manual | ✅ Automatic | Companion keeps Gateway alive |
| Menu bar & notifications | ❌ No | ✅ Yes | CLI cannot show menu bar UI |
| Browser automation (Playwright, Puppeteer) | ✅ Full | ✅ Full | Works fully headless |
| Shell / CLI tools (system.run, file I/O, APIs) | ✅ Full | ✅ Full | Fully functional without Companion |
| Headless server automation | ✅ Ideal | ✅ Overkill | CLI-only is sufficient |
Rule of Thumb:
If your agent needs to “see” or “touch” the macOS desktop → Companion App is required.
If your agent only talks to programs via APIs/shells → CLI-only is enough.
For this guide, we’ll set up the full Companion App to unlock all capabilities.
Prerequisites
- Apple Silicon Mac (M1/M2/M3/M4) for optimal performance
- macOS Sequoia or later on the host
- ~60 GB free disk space for the VM
- ~20 minutes for setup
Step-by-Step macOS Setup
1. Install Lume (macOS VM Manager)
Lume is a lightweight VM manager for Apple Silicon Macs:
/bin/bash -c "$(curl -fsSL https://raw.githubusercontent.com/trycua/cua/main/libs/lume/scripts/install.sh)"Add Lume to your PATH if needed:
echo 'export PATH="$PATH:$HOME/.local/bin"' >> ~/.zshrc && source ~/.zshrcVerify installation:
lume --version2. Create the macOS VM
lume create moltbot --os macos --ipsw latestThis downloads macOS and creates a VM. A VNC window will open automatically.
Note: The download can take a while depending on your connection.
3. Complete Setup Assistant
In the VNC window:
- Select language and region
- Skip Apple ID (or sign in if you want iMessage later)
- Create a user account (remember the username and password)
- Skip all optional features
After setup completes, enable SSH:
- Open System Settings → General → Sharing
- Enable “Remote Login”
4. Get the VM’s IP Address
lume get moltbotLook for the IP address (usually 192.168.64.x).
5. Install Homebrew (Inside the VM)
/bin/bash -c "$(curl -fsSL https://raw.githubusercontent.com/Homebrew/install/HEAD/install.sh)"
echo 'export PATH="/opt/homebrew/bin:$PATH"' >> ~/.zshrc
source ~/.zshrc
6. Install Moltbot (Inside the VM)
curl -fsSL https://molt.bot/install.sh | bashFollow the onboarding prompts to set up your moltbot.
7. Install Chrome and the Extension
Download and install Chrome inside the VM and install the Moltbot Chrome extension:
moltbot browser extension installThen get the extension path:
moltbot browser extension pathOpen Chrome and:
- Go to
chrome://extensions - Enable “Developer mode” (top right)
- Click “Load unpacked”
- Select the directory printed by
moltbot browser extension path - Pin the extension to the toolbar
8. Configure Chrome Browser in Moltbot
Edit the Moltbot configuration:
nano ~/.clawdbot/moltbot.jsonAdd the browser configuration:
{
  "browser": {
    "enabled": true,
    "defaultProfile": "chrome",
    "executablePath": "/Applications/Google Chrome.app/Contents/MacOS/Google Chrome",
    "headless": false,
    "profiles": {
      "chrome": {
        "cdpUrl": "http://127.0.0.1:18792",
        "color": "#00AA00"
      }
    }
  }
}
Restart the gateway:
moltbot gateway restart9. Install the Companion App
The Companion App allows Moltbot to interact with the macOS system at a deeper level.
- Download the Companion App from the official releases
- Follow the installation instructions, you will need XCode and PNPM on your VM
- Open Moltbot from Applications
- Grant necessary permissions when prompted (Screen Recording, Accessibility)
10. Register the VM MacOS as a Node
First, on the VM, start the node host:
moltbot node run --host localhost --port YOUR_GATEWAY_PORT --display-name 'macOS Node'11. Configure LMStudio and Model (Same as Linux)
Install LMStudio on your host machine, then configure Moltbot to use it:
Edit ~/.clawdbot/moltbot.json on the VM:
{
  "models": {
    "providers": {
      "lmstudio": {
        "baseUrl": "http://YOUR-HOST-IP:1234/v1",
        "apiKey": "lmstudio-local",
        "api": "openai-completions",
        "models": [
          {
            "id": "mistralai/ministral-3-8b-reasoning",
            "name": "Ministral 8B",
            "reasoning": true,
            "input": ["text"],
            "cost": {
              "input": 0,
              "output": 0,
              "cacheRead": 0,
              "cacheWrite": 0
            },
            "contextWindow": 32000,
            "maxTokens": 8192
          }
        ]
      }
    }
  },
  "agents": {
    "defaults": {
      "model": {
        "primary": "lmstudio/mistralai/ministral-3-8b-reasoning"
      }
    }
  }
}
12. Test Full Human-Like Interaction
Now your Moltbot can:
- Control Chrome with a full graphical interface (not headless)
- Interact with macOS at the system level via the Companion App
- Execute commands on the VM as a node
- Use AI models from your host machine via LMStudio
Test it by asking Moltbot to:
- Open Chrome and navigate to a website
- Fill out a form visually
- Take a screenshot
- Execute a system command via the node
moltbot tuiUsing the Chrome Extension
To control a specific tab:
- Open the tab you want Moltbot to control
- Click the Moltbot extension icon in the toolbar
- The badge shows “ON” when attached
- Moltbot can now control that tab
- Click again to detach
Important: The extension only controls tabs you explicitly attach — it doesn’t auto-control all tabs.
Running the VM Headlessly (24/7)
Once everything is configured, you can run the VM in the background without a display:
lume stop moltbot
lume run moltbot --no-display
The VM runs in the background, and Moltbot’s daemon keeps the gateway running.
To check status:
ssh youruser@192.168.64.X "moltbot status"Key Differences: Headless vs Companion App
| Feature | Linux/macOS Headless (CLI-Only) | macOS + Companion App |
|---|---|---|
| Browser | Chromium/Chrome headless | Chrome with GUI + extension |
| UI Automation | ❌ No (macOS: ⚠️ Fragile) | ✅ Reliable |
| Screen Capture | ❌ No | ✅ Yes |
| System Control | SSH + Terminal only | Full system access + Node |
| Setup Complexity | Low-Medium | High |
| Use Case | Basic automation, API/shell tasks | Full human-like interaction |
| Cost | Low (VPS) to Medium | Higher (VM + resources) |
| Recommended For | Web scraping, scripts, DevOps, backend tasks | Desktop automation, vision tasks, media capture |
This setup is ideal for users who need a fully customizable, private, and powerful AI assistant. Whether you’re managing emails, automating tasks, or navigating the web, Moltbot provides the tools to make it happen—all while keeping your data secure and under your control.
Configuring Moltbot’s Memory System
One of Moltbot’s most powerful features is its persistent memory system. Unlike traditional AI assistants that forget everything after each conversation, Moltbot can remember your preferences, past decisions, and ongoing tasks across sessions. However, to make the most of this capability, you need to configure how the memory works.
Understanding Memory Files
Moltbot uses three key markdown files to manage its memory and behavior:
1. MEMORY.MD - Agent-Only Instructions
This file is only visible to the main agent (not to subagents or tools). Use this file to store:
- Personal preferences and workflows
- Recurring tasks and automation rules
- Context about your projects and priorities
- Custom instructions that should guide all of the agent’s actions
Example:
# Memory

## User Preferences
- Always use TypeScript for new projects
- Prefer functional programming patterns
- Run tests before committing code

## Ongoing Projects
- Blog redesign: Focus on accessibility and performance
- Moltbot setup: Document all configuration steps

## Automation Rules
- Check for security updates every Monday
- Generate weekly reports on Friday afternoons
Location: ~/.clawdbot/memory/MEMORY.MD
2. SOUL.MD - Session Initialization
This file defines the agent’s personality and session startup behavior. Add an instruction here to force Moltbot to check its memory at the start of every new session:
Example:
# Soul

## Core Behavior
You are a helpful, privacy-conscious AI assistant that respects user autonomy.

## Session Initialization
- **Always read MEMORY.MD at the start of every session** to recall user preferences and ongoing tasks
- Review recent conversation history to maintain context
- Check for any pending tasks or reminders before starting

## Communication Style
- Be concise but thorough
- Ask for clarification when needed
- Respect security and privacy boundaries
Location: ~/.clawdbot/memory/SOUL.MD
3. HEARTBEAT.MD - Periodic Memory Refresh
This file defines periodic background tasks that run automatically. Use it to force Moltbot to refresh its memory regularly during long-running sessions:
Example:
# Heartbeat

## Periodic Tasks (every 15 minutes)
- Re-read MEMORY.MD to check for updates
- Review any new instructions or priorities
- Check for pending reminders or scheduled tasks

## Context Maintenance
- Summarize recent conversation highlights
- Identify any decisions that should be saved to memory
- Detect patterns in user requests for future optimization
Location: ~/.clawdbot/memory/HEARTBEAT.MD
Memory Best Practices
- Keep MEMORY.MD focused: Only store information the agent needs to know across sessions
- Update regularly: As your workflows change, update your memory files
- Be specific: Clear, actionable instructions work better than vague preferences
- Test memory retention: Start a new session and verify the agent remembers key information
- Separate concerns: Use MEMORY.MD for facts, SOUL.MD for behavior, HEARTBEAT.MD for automation
With a properly configured memory system, Moltbot becomes a truly personalized assistant that learns and adapts to your unique needs over time.
Real-World Use Cases
Moltbot’s flexibility and powerful automation capabilities have led users to deploy it in creative and impactful ways. Here are some examples of how people are using Moltbot in production:
Trading Market Automation
Several users have successfully integrated Moltbot into their trading workflows:
-
Automated trading analysis: Moltbot can monitor market data, analyze trends, and execute trades based on predefined strategies. Users report significant time savings by delegating routine market monitoring to the AI. See example
-
Real-time market insights: By connecting to trading APIs, Moltbot provides instant notifications about market movements, portfolio performance, and trading opportunities. Learn more
Productivity & Workflow Automation
One of the most popular use cases is comprehensive task automation across multiple platforms:
- Calendar management: Automatically schedule meetings, send reminders, and manage availability
- Email automation: Filter, categorize, and respond to emails based on priority and context
- Social network management: Post updates, monitor mentions, and engage with followers across platforms
This level of automation transforms Moltbot into a true personal assistant that handles routine tasks while you focus on high-value work. See workflow example
Human-Level AI Assistant
Some users have taken Moltbot to the extreme, configuring it as a full-time AI companion that mimics human assistant capabilities:
- Handles complex multi-step tasks requiring reasoning and context
- Manages personal and professional communications
- Coordinates across multiple tools and platforms seamlessly
Important note: While powerful, this level of integration requires significant resources (CPU, RAM, and model costs if using cloud providers). Running a human-level AI assistant 24/7 can be expensive, especially with premium models like Claude or GPT-5.2. Read more about costs
Community Insights
The Moltbot community continues to discover new use cases:
- DevOps automation: Monitoring servers, deploying code, managing infrastructure
- Research assistant: Gathering information, summarizing articles, tracking sources
- Content creation: Drafting blog posts, social media content, and documentation
- Home automation: Integrating with smart home devices for voice-controlled automation
The key takeaway: Moltbot’s true power lies in its adaptability. Whether you need a simple automation tool or a sophisticated AI assistant, Moltbot can be configured to meet your specific needs.
Conclusion
By setting up Moltbot locally on my hardware, I ensured:
- Full privacy and control over my data and AI interactions.
- High performance with the Mistral 8B model for complex tasks.
- Multiple deployment options: headless Linux for efficiency or macOS for full human-like interaction.
- Seamless browser automation via headless Chromium (Linux) or full Chrome GUI (macOS).
- Persistent memory to track progress across sessions.
Which Setup Should You Choose?
Choose Linux/macOS Headless (CLI-Only) if you:
- Need basic automation and web scraping
- Want to run on a VPS or low-resource hardware
- Don’t need visual interaction with websites or system UI
- Prefer lower costs and simpler maintenance
- Focus on API integrations, shell automation, and backend tasks
- Work primarily with terminal-based tools
- Don’t require screen capture or media access
Choose macOS + Companion App if you:
- Need to interact with websites that detect headless browsers
- Want visual confirmation of what the AI is doing
- Require reliable screen capture and vision capabilities
- Need full system-level automation (clicking, typing in GUI apps)
- Want camera/microphone access for media tasks
- Are willing to allocate more resources for complete capabilities